Sunday, December 18, 2011

Beaded Applique

Someone on a blog asked the question "What is your favorite Christmas decoration."  I have so many that bring back special memories, but this one is my favorite. 

This is my mom's Christmas tree. When I was growing up, we would always go into the woods and select the perfect cedar tree for our Christmas tree, a task my oldest brother Michael seem to enjoy the most.  Then we would decorate it with lots of pretty ornaments that Momma and Daddy had collected and that we had made.  As the years went by, and we grew up, they switched to a huge artifical tree, that was beautiful with all our ornaments on it.  I would help Momma get it decorated each year.  I have pictures of my children looking in awe at Grandma's Christmas tree.  By the time the great grandkids had started arriving, the big Christmas tree and all the decorations were just too much for my parents.

Momma had this sweet "feather" tree that Daddy had made for her many years before and she put her special ornaments on it.  This was the only tree she used in the last 15 years or so of her life.  I would go down in the mornings and help her put the decorations on and it was so very special to me.  The angel on the top of the tree was "Me" according to my mom and of course I believed her :) at least I knew I was in her eyes. She had choir boy ornaments for my brothers - but I was always on top of the tree! The tree is at my house now, and I feel so very priviledged each year to put my Momma's tree up in my home.

Now for the beaded applique.  In my last post I mentioned a bed runner I was working on.  I am now doing the applique on the borders on each end.  I drew some ornaments and when I started putting them on they just looked like they needed a little bling.  Having taken a beading class at the Quilters of SC Piecable retreat in the Fall, I decided to try out some beading on my ornaments, but I  wanted to incorporate the beading with the back basting applique.

I started by adding a bead with each applique stitch, but the beads were laying on their side, not a very attactive look!


Then I remembered that in class, we took the thread  back through the beads, so I tried this and the beads all stood upright, like soldiers at attention.

What fun!  It takes longer to do than back basting without the bling, but I love the look.  Here is what the end border looks like with all the beads.  I added gold chains using DMC gold metalic  floss - not my favorite thing to work with, and a few stitches at the top of the ornaments to be the ornament hanger. I am having fun with this one!

Hope you all have a wonderful Christmas week and a joyous Christmas Day!


Teresa

Thursday, December 8, 2011

Designing Applique

I love to do applique, but have never tried to design my own applique patterns.  Well that is not quite right, I have tried and never could get it right.  I am hoping to do a class next year on a Fall table runner, with this applique that yes, I designed.  Its pretty simple, but its my first design.  I will use it to teach back basting applique and thus it needs to be a simple design, at least that's my story and I am sticking with it!


Here is a glimpse of the runner.  I don't have both sides appliqued yet and obviously it is not quilted yet - but this will give you an idea of the direction I am headed. 

I am having fun with this and am anxious to get it finished.


In addition to the table runner, I am working on a Christmas bed runner.  I just love the idea of a bed runner to cheer up (or holiday-up) a room.  The applique for this one is still tumbling around in my head but will have applique on each end that drops to the side of the bed - I am thinking Christmas ornaments on embroidered gold chains (chain stitch).

That's my Christmas Beauty quilt that I have it lying on. First year I have actuallly used this quilt at Christmas.  I don't see this runner being on something quite this busy, possibly a plain white spread would be better.

Well - so that is what I am up to.  I would like to say thank you  for all that follow my blog.  I see I have picked up a few new followers and that is encouraging. 

Teresa

Sunday, November 27, 2011

Another border idea

In my last post, I talked about various border ideas for my hexie quilt.  While going through some old magazines I came across this quilt in an American Patchwork and Quilting 2005 magazine.

I just love the look of this border and am thinking I could do something similar, but using my little hexie flowers.  Maybe a birdhouse in one corner and a little blue bird or two in the other corner.  I have not done anything like this before, so should be an interesting project.


In the meantime I have been working on a "secret" project and having so much fun playing with beads and beautiful wool.  I should be able to show some finished projects in a couple week or so.

Have you gotten your decorations up?  I have actually completed most of my decorating - just a few more ornaments to hang.  These are my nesting Santas - my grandchildren have more fun playing with these, for that matter, so do I.

Hope you all had a Happy Thanksgiving, and happy holidays to come.

Teresa

Sunday, November 13, 2011

Border Options

I have been on the road again - this time to Washington DC for a business conference.  The weather was lovely, even if I did spend all day (8:30 - 5:00) every day in meetings.  Rather than show you the typical pictures of Washington, I thought I would show you some of the other visitors - the Occupy Washington crowd was there too. 
I took my hexies to work on in the evenings, and this is the stack I completed.  They are smaller than the ones I have been working on for my quilt, measuring just 2.5 inches across.   I want to use them in the border - but how????  There in lies the question.

My first thought was to create a "Posey Chain" around the border since I am calling this quilt Granny's Posies.   But then reality sunk in, that would take almost 175 of these little darlings - not sure I want to go there.
My next option was to create little flowers and with leaves and stems all around the borders, maybe mingling in a butterfly, bluebird, bumble bee every now and then.  I like this option better and it takes about a third of the number of flowers to make.  I just wish I could draw better as creating the bluebird, butterfly and bumblebee are real stretches for me.  I have a talented daugther though that can draw anything, so I am going to have to give her a call.
Have you any suggestions fo rmy border??? I always love seeing all the creative way people border their quilts, but when it comes time for me to do the same I think my mind goes into deep freeze.

My family all came over for homemade soup and cornbread last night.  Afterwards we were in the living room and they saw something that captured everyone's attention.  See that look of anticipation - and even fear on their faces? 
So you may be asking, or maybe you aren't, but here is what they were anxiously awaiting. The cuckoo scared little Taralyn so much she did not even want to go in the living room again the rest of the night. 

My wonderful brother and his wife brought me this clock from a recent visit to Germany.  

Happy Stitching!
Teresa


Sunday, October 9, 2011

Bargello Quilting is FUN!

First I will announce the winner of the Sewline Needle Threader.

That would be Thimbleanna.  I just love Anna's blog and hope you will check it out. 

My review of the threader is that it works like a charm and I like it, except.... it is very sensitive and you can't force it into the needle cause it will break. Speaking from experience here - yes I broke mine. But you can purchase replacement cartridges so I have a couple on order.  I used too big an embroidery needle - should have known as it was hard to get the needle into the slot.  Live and learn.

Yesterday was Stitchin Friends club meeting and we had so much fun. Sylvia Strange was our guest teacher and she is an excellent and very patient teacher.

Here is my quilt. Its quilted an ready to bind and then will be hanging on the wall in my office. I just love the colors.

I had enough strips left to make a pillow top.

This was a fun project and I hope I can find time to have more bargello in my future.

Happy Stitchin'
Teresa

Tuesday, October 4, 2011

You know its time to post to your blog when.......

...a friend calls you on the phone and asks if you are ever going to update your blog!  HaHa - thanks for the nudge Cheryl.  So, I thought I would share with you a quilt shop I visited today.

I am in Durham NC for a business meeting and thought I would check out Thimble Pleasures in Chapel Hill while I was in the neighborhood.


That big black Crown Victoria with the NY plates was the car Enterprise chose for me to drive!  There was a mixup with my reservation and they provided me with this.  Made me feel downright mafia-like.  All it needed was the dark tinted windows.


What a great shop - lots of light, space to move around easily admiring all the shop samples and an amazing assortment of fabric.   Not many kits, but lots of inspiration hanging on the walls and fun patterns to look through.  The wall of notions really caught my eye as I am a sucker for a new notion..and am going to share one in a give away with you at the end of this blog. 


And of course, I had to make a few purchases.  I have been trying to be good and not buy fabrics unless I have a specific quilt in mind, although I did have to buy a 1/2 yard cut of one that just kept catching my eye.


 Now gadgets and notions are an entirely different matter.  I am like a kid in a candy shop when comes to new "stuff" and some old stuff - like buttons. 


One new item I discovered is the Sewline Quickthru needle threader for fine needles, sizes 9 - 12.  These old eyes twinkled when they saw this and I knew I had to try it. 

And thus the give away - I want YOU to try it with me.  Leave me a comment and I will draw a name on Sunday, October 9 and it could be yours.

As always, if you don't have a blog or can't post for whatever reason to my blog - just send me an email to put your hand in the drawing (jqd@comporium.net )

Good luck, and I'll be chatting on Sunday with a new project in the works to share.

Happy Stitchin'
Teresa

Sunday, August 28, 2011

And the winner is......

Leanne, at www.quiltmekiwi.blogspot.com !!!!!  Congratulations Leanne, and send me your mailing address and I will send you these lovely threads.  I do hope you enjoy the YLI #8 Pearl Cotton threads as much as I have.


I have been working this week on my snail trail border for my Doh-si-Doh quilt.  These little 3" blocks are quite a challenge and I had to come up with some organizational ideas to keep me straight. Soon I will show my paper piecing process, but first I would like to share how I got organized to make the blocks.

First I had to make notes on what size pieces I needed andhow many.  I hope you can read this card, if not, then double click to enlarge.  The cutting guide shows the size square to cut, which then has to be cut in half to form triangles.  Sizes were 1 1/4", 1 3/4", 2 1/2" and 3".  I kept getting it confused, so the need for the card.


Next was setting up the layout of the block.  I kept getting my pieces in the wrong order, so I printed out the block on cardstock, and labeled my fabric A and B.  A blank meant background.  Since this is a border, I just needed the two colors.

I sew these blocks in sets of two, a top block an a bottom block.  This is the card for the Top, and the bottom card is similar.  These cards are my life line in piecing the blocks, which get very confusing with all the twists and turns. Anyone of you who have ever done a snail's trail block know what I mean.


I labeled my foundation papers as Top or Bottom, so that I could keep it straight which one I was working on.  This also gave me a reference point to line up with the pattern card to make sure I was positioning the fabric correctly.


On the back of the paper foundation piece I drew reference lines to be used in lining up the fabric pieces when sewing. 

These lines were invaluable when lining up the beginning 4-patch.  This helped me to center the 4 patch in the center of the square and to ensure the block was not tilted.


And finally, last but definitely not least, I lay out all my pieces needed for the top and bottom blocks on the design board.  The "A" pieces are on top, the background pieces in the middle and the "B" pieces on the bottom.  This has really helped me so much in keeping the pieces straight.  Not that I have not made some booboos - and will continue to do so. 


Well that is all for now, more to follow on the paper piecing process. Hope this gave you all some ideas on how to organize your piecing process.

Thanks for stopping by,
Teresa

Tuesday, August 16, 2011

The Last Stitch

Checking my followers list, it is so nice to see that I have not lost any of you in my absence.  Thanks for hanging in there with me and to celebrate your still being here, I have a give away that I think you will like.  

So here I am taking the last hand quilting stitch on my Circus Stars Quilt !!!  I have it bound, labeled and washed now and neatly folded away from cat hair until I can get my daughter to help me get some nice pictures.  More to follow.


Now about the give a-way.  I have mentioned many times that I was hand quilting this quilt using the big stitch (in my case JUMBO stitch) with #8 pearl cotton YLI threads. This thread is pretty and is a fun to quilt with.  I enjoyed it so much, I thought I would share some with you - and here it is. Three skeins of in some of my favorite colors, but I love them all, so it was hard to choose. 

So if you would like to win these lovely threads, just leave a comment on my blog.  That is all there is to it.  If you can't leave comments, then send me an email at jqd@comporium.net and I will enter you in the drawing.  I will draw a name on Sunday, August 28.

In the mean while, I will be working on this snail trail border for my Doh-si-Doh quilt. 
 These are tiny little pieces, as you can see in this picture of the four patch that is in the center of the block. The penny would actually cover up the four patch if I laid it on top of it.   The fabrics are the same I used in the quilt and I thought this would make a nice border, but WHAT WAS I THINKING!!!!!  Seems like I can turn the simplist of projects into a challenge.
Here are all the tiny pieces sorted in sandwich bags - the only way I can keep from losing them.  I am piecing by paper piecing using an add-an-eighth ruler.  I will show more on this process later.


Well, that is it for now.  Please enter the drawing as I know you will love these threads.
Happy Stitching,
Teresa


Saturday, July 23, 2011

Ho - Ho- Ho

I have been working on a Christmas Placemat that I will be teaching my club to make next month.  This is from a McCall's Quilting magazine, December 2007.   I modified the pattern dimensions a little to accomodate paper piecing the Santa.
This is the placemat before it is quilted and bound - I guess it is a flimsy placemat.


The pattern called for a fabric bow to be tied to the hat. While it was cute, I did not particular want that on my placemats, so I have been auditioning different things to put on the Santa cap.

Below are the three finalists - which do you like best?


Thanks for your input,
Teresa

Sunday, July 17, 2011

On to the borders...

Finally, I finished quilting all the stars on my Circus Stars quilt and have moved on to the borders!  Can hear a big HURRAH out there?  Seems like it has taken forever to get this far, but I must admit a tinge of sadness when I finished that last star, we've become good buddies, the quilt and I.

So anyway, I thought I would show some pictures of the quilting I am doing on the border.  I am keeping it pretty simple. Since I am calling the quilt Circus Stars, I thought it should have rings around the border - and the corners should have 3 rings, like a 3 ring circus.  Now I probably did not not need to explain that you you smart ladies and gents, but my daughter did wonder if anyone would "get it?"  And in circus style - you will note that I am doing "jumbo" quilting stitches which I also think is suitable for a circus named quilt (and that's my story and I am sticking with it.)


 Here is the pattern on the border, like I said, it is simple. 
 
 You can probably see the pattern a little better on the back side of the quilt, I know the jumbo stitches sure show up better.  I am using #8 YLI pearl cotton in variagated colors.  This thread is a joy to work with.

And here are views of the border corners, front and back. 

Quilting the border is going fairly fast compared to the stars, and I have had lots of time this since last evening.  I took a little tumble yesterday, and hurt my foot, so I am trying to stay off it for a day or so. Nothing broken, at least I don't think so, but thanks to the quick thinking of my daughter, Ellen, who put a bag of frozen blackeye peas on my foot, there is very little swelling (wonder if her distaste of blackeye peas had anything to do with her choice?) 

A word of advise, it doesn't matter if you love your crocs, and you have had them for 5 years, and they aren't torn up - throw them away!!  Once they get smooth on the bottom, they slide on wet surfaces, or even dry surfaces if the bottoms of the croc are wet.

Happy Stitchin'
Teresa

Monday, June 27, 2011

My New Space :)

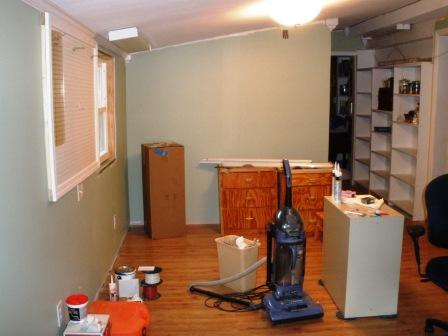
Well finally it is done (almost - a few pieces of trim still need to be added.)  A look back - this is what my space looked like a couple of weeks ago.  I have had my "treasures" boxed up for weeks now waiting for this renovation to begin and was so happy when it finally got started.

So .......here is a tour of my new space, all except the storage closet which needs a little straighteneing up as there is a pile of yard sale treasures in there right now.

Special shelf for my pincushions

View showing peg board


Special location for sewing box my brother made and knitting needles and crochet hooks in wooden vases made by my father. The Tatted cross was made by my mother.
Design Wall - with my Do-si-Do Square Dance quilt.

Shelf space for my Buttons and Books


View from across the room.  The drawer units were made by my father and I just could not bring myself to paint them. There is room for  two friends to sit across from the cutting table with their machines or handsewing to enjoy a time fo sewing and chatting.


Built in shelf beside the fireplace in the Living Room.  We removed this shelf to make room for my Mom's Secretary.  Also added the crown molding.  When the shelf was removed, it left a big bare place on the floor where the carpet was, so our contractor suggested we put the leftover pergo there on either side of the fireplace.  Perfect!


I am sorry about how these pictures are scattered everywhere.  Blogspot is not cooperating with me tonight and I am just too tired to argue with it.

Thanks for stopping by,
Teresa

29031