
 I purchased my supplies, which are minimal, from Lowes. I purchased two "marker" boards to protect my table top. They are slick and easy to pin on. Its kind of like the boards they used to make peg boards, but without any holes. These were also finished so I think you could use dry erase marker on. I needed two to get the width of my table - I think they are 3 x 4. The boards for wrapping are PVC boards and are used in vinyl house covering. They have a nice finish that tape will stick to.
This is where I was "wrapping" the boards. I actually taped by fabric to the board before I began wrapping them just to make sure I had the fabric straight and it would not slip. In the demo, the quilter simply folded the fabric around the board and then started wrapping. But she was doing a small quilt and I was concerned that my larger one would slip - so I taped it to the board.
I was very careful to keep it straight, but even so, the backing got a little off center creating a pleat on the back. I guess its a learning process, and I did get the pleat out. I have to wonder if I had stretched the fabric a little when pressing or if maybe it was a little off bias from ripping instead of cutting.
In the tutorial, she recommended starching the backing 2 or 3 times, before wrapping - I only did it once, maybe I should have done it more.
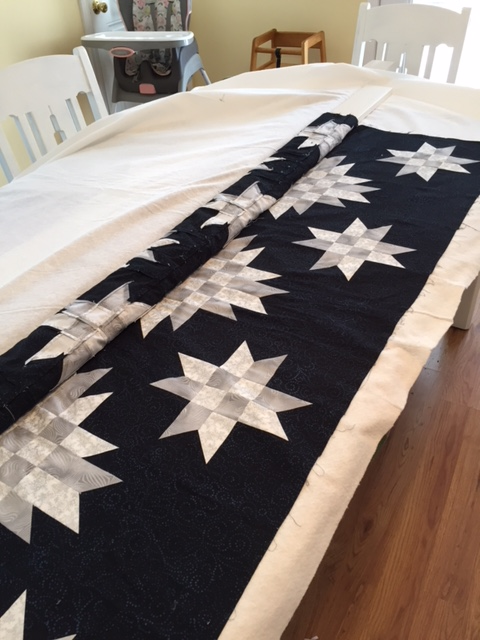
Here it is all wrapped and ready to baste. In the tutorial, the quilter thread basted her quilt and commented she felt it held the quilt together better in the quilting process. She does this for both hand quilting and machine quilting.
I chose to pin baste mine as that is my preference when machine quilting. I do thread baste for hand quilting.
This process was so much easier as I could just sit at the table and pin it, rather than standing over a table and reaching and hurting my back. Also just unwrapped a small section of the quilt at a time, which help to keep it straight and flat. This took me a couple of hours, but normally it would take me all morning - at least 4 hours.

Now to decide how I want it quilted. I purchased some Aurifil silvery grey thread recently to try out on this quilt. Its 100% cotton, 50 wt - looking forward to giving this a try.
Teresa
2 comments:
This same method of board basting worked well for me. No more crawling around on the floor. I board basted two quilts with needle and thread. No puckers. I am glad it worked out for you.
I have been wanting to try that process. I understand it can be done across the backs of chairs but I have no table to spread things out on so borrowing a neighbor;\'s floor is a lot quicker.
Post a Comment