Sunday, August 28, 2011

And the winner is......

Leanne, at www.quiltmekiwi.blogspot.com !!!!!  Congratulations Leanne, and send me your mailing address and I will send you these lovely threads.  I do hope you enjoy the YLI #8 Pearl Cotton threads as much as I have.


I have been working this week on my snail trail border for my Doh-si-Doh quilt.  These little 3" blocks are quite a challenge and I had to come up with some organizational ideas to keep me straight. Soon I will show my paper piecing process, but first I would like to share how I got organized to make the blocks.

First I had to make notes on what size pieces I needed andhow many.  I hope you can read this card, if not, then double click to enlarge.  The cutting guide shows the size square to cut, which then has to be cut in half to form triangles.  Sizes were 1 1/4", 1 3/4", 2 1/2" and 3".  I kept getting it confused, so the need for the card.


Next was setting up the layout of the block.  I kept getting my pieces in the wrong order, so I printed out the block on cardstock, and labeled my fabric A and B.  A blank meant background.  Since this is a border, I just needed the two colors.

I sew these blocks in sets of two, a top block an a bottom block.  This is the card for the Top, and the bottom card is similar.  These cards are my life line in piecing the blocks, which get very confusing with all the twists and turns. Anyone of you who have ever done a snail's trail block know what I mean.


I labeled my foundation papers as Top or Bottom, so that I could keep it straight which one I was working on.  This also gave me a reference point to line up with the pattern card to make sure I was positioning the fabric correctly.


On the back of the paper foundation piece I drew reference lines to be used in lining up the fabric pieces when sewing. 

These lines were invaluable when lining up the beginning 4-patch.  This helped me to center the 4 patch in the center of the square and to ensure the block was not tilted.


And finally, last but definitely not least, I lay out all my pieces needed for the top and bottom blocks on the design board.  The "A" pieces are on top, the background pieces in the middle and the "B" pieces on the bottom.  This has really helped me so much in keeping the pieces straight.  Not that I have not made some booboos - and will continue to do so. 


Well that is all for now, more to follow on the paper piecing process. Hope this gave you all some ideas on how to organize your piecing process.

Thanks for stopping by,
Teresa

Tuesday, August 16, 2011

The Last Stitch

Checking my followers list, it is so nice to see that I have not lost any of you in my absence.  Thanks for hanging in there with me and to celebrate your still being here, I have a give away that I think you will like.  

So here I am taking the last hand quilting stitch on my Circus Stars Quilt !!!  I have it bound, labeled and washed now and neatly folded away from cat hair until I can get my daughter to help me get some nice pictures.  More to follow.


Now about the give a-way.  I have mentioned many times that I was hand quilting this quilt using the big stitch (in my case JUMBO stitch) with #8 pearl cotton YLI threads. This thread is pretty and is a fun to quilt with.  I enjoyed it so much, I thought I would share some with you - and here it is. Three skeins of in some of my favorite colors, but I love them all, so it was hard to choose. 

So if you would like to win these lovely threads, just leave a comment on my blog.  That is all there is to it.  If you can't leave comments, then send me an email at jqd@comporium.net and I will enter you in the drawing.  I will draw a name on Sunday, August 28.

In the mean while, I will be working on this snail trail border for my Doh-si-Doh quilt. 
 These are tiny little pieces, as you can see in this picture of the four patch that is in the center of the block. The penny would actually cover up the four patch if I laid it on top of it.   The fabrics are the same I used in the quilt and I thought this would make a nice border, but WHAT WAS I THINKING!!!!!  Seems like I can turn the simplist of projects into a challenge.
Here are all the tiny pieces sorted in sandwich bags - the only way I can keep from losing them.  I am piecing by paper piecing using an add-an-eighth ruler.  I will show more on this process later.


Well, that is it for now.  Please enter the drawing as I know you will love these threads.
Happy Stitching,
Teresa


Saturday, July 23, 2011

Ho - Ho- Ho

I have been working on a Christmas Placemat that I will be teaching my club to make next month.  This is from a McCall's Quilting magazine, December 2007.   I modified the pattern dimensions a little to accomodate paper piecing the Santa.
This is the placemat before it is quilted and bound - I guess it is a flimsy placemat.


The pattern called for a fabric bow to be tied to the hat. While it was cute, I did not particular want that on my placemats, so I have been auditioning different things to put on the Santa cap.

Below are the three finalists - which do you like best?


Thanks for your input,
Teresa

Sunday, July 17, 2011

On to the borders...

Finally, I finished quilting all the stars on my Circus Stars quilt and have moved on to the borders!  Can hear a big HURRAH out there?  Seems like it has taken forever to get this far, but I must admit a tinge of sadness when I finished that last star, we've become good buddies, the quilt and I.

So anyway, I thought I would show some pictures of the quilting I am doing on the border.  I am keeping it pretty simple. Since I am calling the quilt Circus Stars, I thought it should have rings around the border - and the corners should have 3 rings, like a 3 ring circus.  Now I probably did not not need to explain that you you smart ladies and gents, but my daughter did wonder if anyone would "get it?"  And in circus style - you will note that I am doing "jumbo" quilting stitches which I also think is suitable for a circus named quilt (and that's my story and I am sticking with it.)


 Here is the pattern on the border, like I said, it is simple. 
 
 You can probably see the pattern a little better on the back side of the quilt, I know the jumbo stitches sure show up better.  I am using #8 YLI pearl cotton in variagated colors.  This thread is a joy to work with.

And here are views of the border corners, front and back. 

Quilting the border is going fairly fast compared to the stars, and I have had lots of time this since last evening.  I took a little tumble yesterday, and hurt my foot, so I am trying to stay off it for a day or so. Nothing broken, at least I don't think so, but thanks to the quick thinking of my daughter, Ellen, who put a bag of frozen blackeye peas on my foot, there is very little swelling (wonder if her distaste of blackeye peas had anything to do with her choice?) 

A word of advise, it doesn't matter if you love your crocs, and you have had them for 5 years, and they aren't torn up - throw them away!!  Once they get smooth on the bottom, they slide on wet surfaces, or even dry surfaces if the bottoms of the croc are wet.

Happy Stitchin'
Teresa

Monday, June 27, 2011

My New Space :)

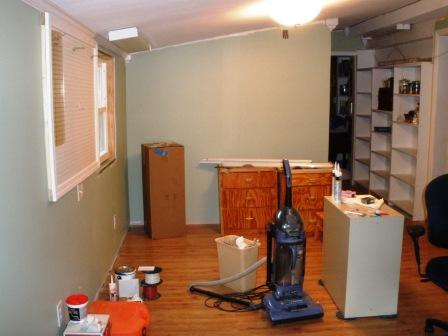
Well finally it is done (almost - a few pieces of trim still need to be added.)  A look back - this is what my space looked like a couple of weeks ago.  I have had my "treasures" boxed up for weeks now waiting for this renovation to begin and was so happy when it finally got started.

So .......here is a tour of my new space, all except the storage closet which needs a little straighteneing up as there is a pile of yard sale treasures in there right now.

Special shelf for my pincushions

View showing peg board


Special location for sewing box my brother made and knitting needles and crochet hooks in wooden vases made by my father. The Tatted cross was made by my mother.
Design Wall - with my Do-si-Do Square Dance quilt.

Shelf space for my Buttons and Books


View from across the room.  The drawer units were made by my father and I just could not bring myself to paint them. There is room for  two friends to sit across from the cutting table with their machines or handsewing to enjoy a time fo sewing and chatting.


Built in shelf beside the fireplace in the Living Room.  We removed this shelf to make room for my Mom's Secretary.  Also added the crown molding.  When the shelf was removed, it left a big bare place on the floor where the carpet was, so our contractor suggested we put the leftover pergo there on either side of the fireplace.  Perfect!


I am sorry about how these pictures are scattered everywhere.  Blogspot is not cooperating with me tonight and I am just too tired to argue with it.

Thanks for stopping by,
Teresa

29031

Thursday, June 16, 2011

Twisted Pinwheels

Saturday was the monthly meeting of Stitchin' Friends - my quilt club.  This is my favorite day of the month as we always have so much fun and it is just good to have that time of fellowship. 

This Saturday I taught making the Twisted Pinwheels quilts with the Offset Square Template.  I must admit, I was not too happy with this template when I first bought it.  The instructions come with a picture of the block layout like the one you see on the cover, and instructions that basically say lay the template on the fabric, cut the fabric out, sew the pieces together.

So I go to my favorite source, Google, and found that many other women were having the same problems I was with the template.  I contacted the designer, and she responded that the instructions that come with the template are all there are, but she did give me one very helpful hint that I will relay in a minute.  Once I figured out how to make the quilt, it was simple and I just love making these now.  I see a Christmas table runner in my future.
So here is the way I am putting it together:
  1. The template has no marking of which is the top and which is the bottom.  You can use it either way, but you have to be consistent or pinwheels twist in different directions.  So I laid the pinwheel on the one of the cover, to determine which was the correct side, and put a dimensional sticker on that side. Problem solved.  My sticker is close to the center, but I had my group put their closer to the bottom right corner.  What is interesting about this template is that it has two right angles and it can be confusing which one goes on the straight of grain.  You have to study the picture closely to figure this out, but its the smallest side and the corresponding right angle that you line up on the straight of grain so that your block will not have bias on the outer edges.  So move the sticker to the bottom right corner to remind you how to line it up.
  2. Next I made a "block board" covering a 7.5" square of cardboard with white flannel, then drawing the template on each corner of the board, just like the block goes together.  This is extremely helpful when laying out your blocks.  I made two for each for the club members, but they wanted more so they could layou the entire row.

    It is important that when you cut out your fabric wedges, that all layers of the fabric have the right side up.  Do not fold the fabric, as your pinwheels will be twisting in different directions if you do.  I cut out 7.5 inch fabric squares, then cut the four wedges for the pinwheel out of each 7.5" square, hardly any fabric waste doing it this way.  You cut the wedges out in the same order as shown on the block board.
3.. Here is the fabric laid out on the block:
I am doing my block scrappy style, so each of my wedges are different.  You have to remember if you are wanting to add a border, on the top, bottom and side rows you have to add border wedges in the correct positions.  I gave each member the layout for the table runner, and it sure helped to see where the border blocks go.
Further, I recommend that when making these block, you only sew together one block at a time.  It is easy to get the wedge pieces out of order.  They go together really fast though, kind of like making a four patch.  The two sides you sew together are not the same length.  You line the corner up that is in the center of the block, and there will be a little tail hanging off the outside edge, but it will be straight.  Sorry no picture on that one.
4. The designer told me not to press any of the seams on the block until I had it all sewn together as this would minimize stretching along the bias.  I tried this, and it really does help.

If you would like a .pdf copy of the instruction sheet I gave out at the meeting which includes fabric requirements for the table runner, a lapsize quilt and a full size quilt and a picture of the table runner layout,  just send me a note at jqd@comporium.net and I will put one in the mail to you.

Here's some pictures of the various fabrics the ladies used.  Some got a away before I could take pictures. The variety was great!
Carol's
Cheryls'

Brenda's

Linda's - she finished hers at home!


Vicki's
Mary's


This one is mine, hanging on my design wall at home.  It will be a full size quilt.

And finally a little show (if you are still with me)


Brenda's Mariner's compass


Darlene's Double Wedding Ring that was started several months ago as a table runner. She turned hers into a quilt for her daughter who recently married.

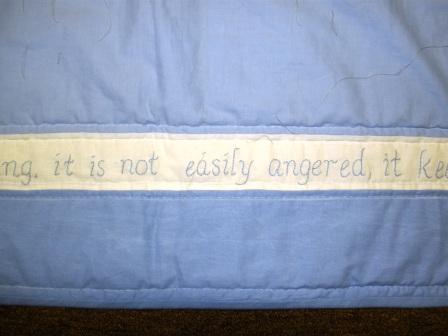
The white border you see has a Bible verse, hand embroidered around the  border of the quilt from I Corinthians.

And she hand quilted it, beautifully!

Its truely an amazing quilt and Darlene has only been quilting for about a year now!!!!!


T-t-t-t-hat's all, folks,
Teresa
28265


Sunday, May 29, 2011

Lots of work in progress!

I just had to share this picture with you all.   One morning, I came out to go to work and this is what I found on my car window.  The detail of this "eagle" image was amazing - you could actually see the outlines of the feathers.  What you cannot see, is the fine drawing in the center of the bird's beak and head - I promise it looked just like an eagle, but much smaller.   My sister-in-law spotted a blue bird pecking at my side mirrow a couple of days later, and I guess that is what made the image, but it sure got my day off to a good start.   Unfortunately, there was no one home at the time for me to share this with.  :(


The last 6 weeks, all I have accomplished in the quilting area is hand quilting on my circus stars quilt and English paper piecing my hexies.  I am getting close to having all the stars quilted and that is exciting.  Also, I only have a couple more rows of hexies to make and then I can start working on the borders.   Yea!
The reason for all the handwork is that this is what my sewing room looks like  and this is what all my stuff looks like. (well some, there are several piles like this).   Its an unsettling mess at my house right now, with workmen in and out, piles of my and my husband's "stuff" in every room except the bathrooms and kitchen.  I keep telling myself, its going to be so nice when it is all done...WHENever that will be. We have a great contractor, and he is doing excellent quality work, so I just need to be patient - so everyone keeps telling me.

I have made good use of having all my stuff out where I can see it, as I have started organizing and giving away and throwing away - all those things that you plan to get around to some day.  Here is the start of the shelving unit that goes back into the storage closet.   Progress is definitely being made in that area and that feels soooooooo good.

So that is my life right now - living in a construction zone.  I am not complaining, ok, maybe a little complaining.  My heart goes out to all those people who have lost their homes and loved ones and are dealing with days on end with no power and total destruction of neighborhoods. 

Teresa
28127