Friday, March 8, 2019

What have I been doing?

I have made progress on some of my other projects, and doing a recap here. This work has been done in January and February this year, inbetween working  on finishing up the hand quilting on the Star of Bethlehem. 

I showed this quilt on an earlier post where I had finished all the border blocks and had the quilt top put together.  I decided to add a top border which will be the part that covers the pillows, since I really prefer a rectangular quilt.  Since so m any of the blocks have twilled embroidery using #8 perle cotton, I decided to carry the embroidery to the top border.  I am working on a long (80") border with these twilled roses.  I will be adding another border of the Seminole pieced pattern surrounding the feather star section of the top on either side of the roses.  I am so anxious to see how this is all going to come out.
  
My guild offered a workshop in Sashiko stitching which can be both decorative embroidery or used as quilting stitch.  This the sample I worked on in class.  Our instructor, Marge Mitchell,  provided a kit with the thread (she used #8 perle cotton), needle (chenille needle #22) and the fabric, which is silk.  She had already drawn the pattern on a flannel backing and we actually did the stitching from the reverse side of the sample.

This was an enjoyable class and I really like this look and this pattern.  I am going to use it on the blue quilt shown above for the backing around the star block.
 I have three grandchildren with birthdays in February.  My little Toby wanted another sock monkey (he got one for Christmas).  He was getting another from someone else, so I decided to make a sock monkey pillow case to use as a wrapper for his birthday gift.  I  think he really liked it, although I don't think he understood what it was.  His sister got his pillow and put it in the case and then he understood and seemed very happy.
January is the month my club has their winter retreat.  We always have a goody bag full of gifts from all the members attending the retreat, most of which are hand made gifts. My friend, Darlene, and I made the large zipper bags to put the goodies in back in the Fall, but I could not show until after the retreat was over.

This is my bag, full of the string blocks I have been working on.  The bags are approximately 14" x 18".  I neglected to get the monogram picture, but my daughter monogrammed each of the bags with her thingie that cuts out plastic lettering.   This big pouch was a big hit with the group and I love keeping the blocks in process in it.

The pattern we used is Work in Progress Bags by Amanda Jean Nyberg of Crazy Mom Quilts.  You can contact her if you want to purchase the pattern.  Her pattern is for bags 11"x11", 14"x14", 14" x 18" and 16" x 18".

And speaking of the string blocks, I completed all 72 blocks on Saturday, March 3 - keeping my mind off the upcoming stress test. I think there may be more than 72 as I kept miscounting.   Nothing relaxes me more than sewing, whether it be hand sewing or machine sewing.

I guess that's it for now.  I have also been working on my Pemberley quilt, but that will be a separate blog post.

Teresa

Star of Bethlehem - Completed

 Star of Bethlehem Quilt which I began piecing in December 2016.  Completed February, 2019.

All the star blocks are hand pieced using English Paper Piecing. All fabrics are from the Forever Love, Eleanor Burns line by Moda. 

The star blocks are actually only 12" square, but inbetween each block I added an Hour Glass block, which tends to make them much bigger looking.

I completed the hand quilting and binding this year in February.  Its been a rough few months for me.  I fell in mid-November, 2018 down a flight of stairs, ending with a brain concussion and fractured skull.  Very little quilting went on in November and December, but I was able to do some quilting in January.  At the end of January, I had a heart procedure to correct my heart SVT which doctors believed may have caused the fall.  Then this  week, I had a stress test on Monday, which indicated I had a 70% blockage on the front of my heart, which really was a shock for me, as my doctor had just told me I have a very strong heart and that he only wanted the stress test to cover all the bases since my fall.  Heart Cath was yesterday, and Praise the Lord, they found no blockages.  I am not allowed to sew today or tomorrow as they put the tube in my right hand wrist and I can not turn the wrist for 48 hours.  Its nice I can type without turning my wrist.

This is the backing for my quilt.  I love the backing but it does not show up the hand quilting I did.  I debated  on using it, but my love for the fabric won out. 

The quilt is quilted in an ecru YLI hand quilting thread for the most part.  I did quilt the border in a deep rose color, as I did not like how the ecru looked against the rose.

The quilting is very dense.  Each piece of the stars is outline stitched.  In the corners of each of the Hour Glass blocks I used a corner stencil, which then became a pattern where the four blocks come together.  I have a picture of this below, but it is kind of hard to see.   The space between the star and the corner is quilted with straight lines. 

The border is primarily cross hatched, but I did do a pretty flower block in each corner.  Once again hard to see, but there is a picture below.

I so enjoyed making this quilt.  Now on to the next hand quilting project.  Thanks for stopping by,
Teresa


Monday, February 4, 2019

String Quiting

I so enjoy making string quilts.  I will be teaching a class to my quilt club on Saturday on how to make a string quilt so of course, that meant I had to start one. 

This was my first block.  I chose to use all Fall colors with a center string made of a dark green fabric. 

This block is different from string quilts I have made in the past, in that all the strings are the same width and seams will therefore need to meet. Therefore we are drawing lines on the muslin foundation where the edge of the string will line up, and then sewing a 1/4" seam across. 

Here are two blocks sewn together and I am so happy to see the seams lining.  Sometimes they are just a little off, but I think it still looks great.

So while I was out of town this past week, I kept thinking about these strings, and got to wondering how would it look if is was not scrappy, but rather just a few choices of fabrics.   I have a baby quilt for a boy to make for an expectant mother in my church, so I decided to give this a try  for the baby quilt.

The first block is 9 1/2", which is too big for a baby quilt, so I drafted out a 6 1/2" block with 4 fabrics.  I had some fabric with happy frogs to use for the backing and I just went to my stash and looked for fabrics that I could match up with the backing.  This is also a fun quilt to make.

 I am really liking the pattern created.  I did have to had on additional fabric next to the orange in the center.  I did not have enough orange, so chose another yellow and this creates an hour glass block in the middle when I sew the blocks together. 

Sunday, February 3, 2019

Pemberley Progress

Tonight I finished appliqueing the corner flower pots and borders on to the center section.  I get a little more excited each time I complete a step in the instructions.  Still a ways to go.

This is a picture of the entire quilt I pulled off the internet.

Tuesday, January 29, 2019

Feathered Star block

I have been showing blocks as I finished them from a BOM being sponsored by my guild.  I decided to have the center of the quilt a Feathered Star, surrounded by a Seminole border and then the outer borders made up of the blocks.  I got the quilt top done today, It is around 80" square.  I am considering adding a top and bottom border to just get it to a rectangular size.  OR I could add a larger border just to the top like a pillow cover....hmm I kind of like that idea. 


Now the problem I discovered after I had the quilt top together.  This block has a big white square in the middle, but note the other blocks are more like a snowball block.  Well, I made the mistake of using the white background fabric in the flying geese blocks you see in the corners. In this picture they look a little darker than white, but that is just the blue shadowing through - in real life the shadow does not show up that much. Dadgum, this was the last block I made and wouldn't you know, it would be the one I really messed up.

 Hmmmmm..no way was I going to rip that out and fix it.   I considered appliqueing a block  over the white but that would probably be very noticeable. 
My solution - just color the white with a blue crayon and then iron it to get the wax out.  The background fabric is a white on white floral print, and when I colored it, the flower came through making it almost look like a printed fabric.  I think it looks fine now, hopefully no one will even notice I had to color it. 


Monday, January 28, 2019

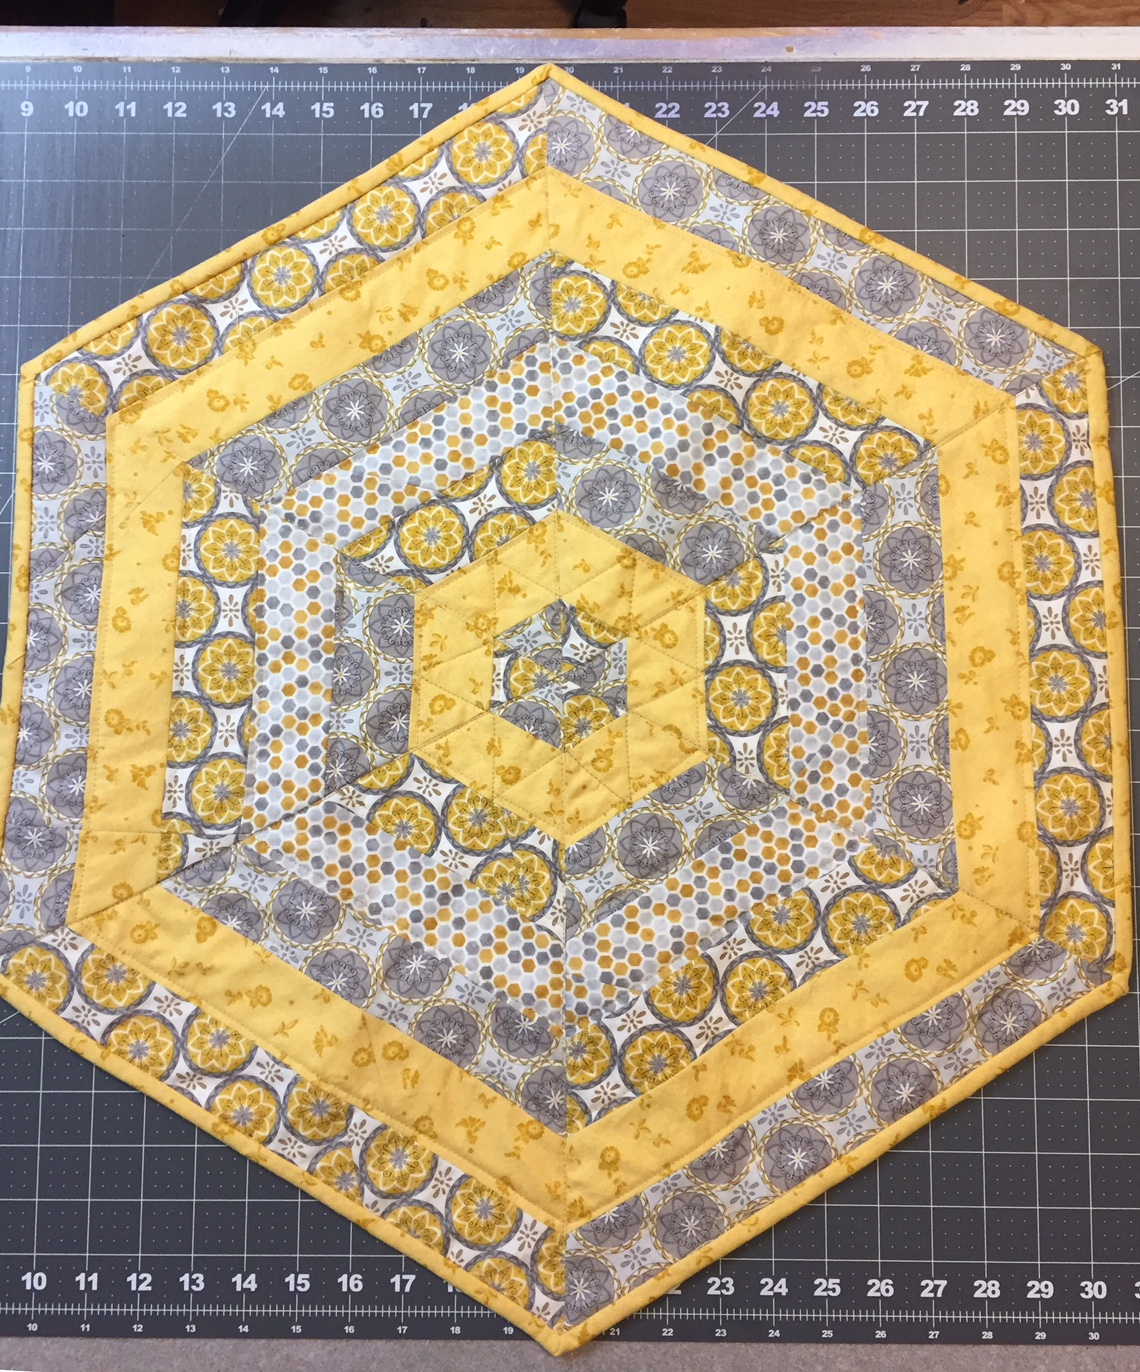
Hexie Topper by Sandy Larsen


This month was the retreat month for my club, Stitchin' Friends.  I do a project/demo at each retreat, and for this year, I used Sandy Larsen's pattern Hexie Topper. I had purchased a pattern for each person and included it I their goody bags.  They each brought their own fabrics and we had so much fun seeing how each person's turned out.


This is the first one I made and used as a sample to show the members what we would be making at retreat.  It was a lot of fun to make and I thought the fabrics just looked like Spring to me.


My project for retreat involved apple theme fabrics that I thought would make a good Fall table topper.

For this one I had to piece some of the strips and unfortunately I had not pieced one of the strips long enough and did not have enough to complete the 6th triangle.  So it had to wait to be finished at home.

I have had the salt and pepper shakers for a long time now, and I usually set them on the kitchen table in the Fall.  They look right at home on my apple topper. Hmmmm...a plate of apple dumplins might look good there too.


For my next one, I decided to see if I could make on with 10 different fabrics and chose Fall fabrics.

The trick for this one, is that when I sew the 10 strips together, the width of the 10 strips must be 10 1/2" to get enough triangles out of the strip set. 

So I cut each strip 1 1/2" wide and that worked out just right.  I really like this one, but with an even number of strips you do not get that center ring made of just one of the fabrics.


 My final method was to use 7 strips, each cut 2".

These were all so easy to make and so much fun.  I have one more in mind, one that has 3 strips cut 3" and 2 strips cut 1 3/4".  I even bought some cute teacup fabric for the 3 wide strips. 


Tuesday, January 15, 2019

Jasmine quilt hoop

I finally found a source for a replacement hoop for my Jasmine floor frame. I had to order from a quilt shop in Germany, and it arrived today.  Now to finish up the quilting of the Star of Bethlehem quilt.  I only have 4 more border triangles and on corner to do.

Thursday, January 3, 2019

Designing an Inner Border

I have been pondering over how to combine my Feathered Star and my embroidered Blocks for the last few days. 

I set the embroidered blocks on point, using the dark blue used in the feathered star to border the block and provide a division between the blocks and the floral print I also used in the feathered star.  I was very pleased with this look.

This block on point measures 20 1/2" unfinished. 


This is where the problem begins - my Feathered Star which is to be the center of the quilt measures 30 1/2" unfinished.  The blocks are to surround the center star.....but when I place two blocks beside the center - they measure 40" compared to the star's 30"

This basically means I need a 5" border all around the star in order to get it to match the block surrounding it.  I feel like a 5" border surrounding the star is too overwhelming and will detract from the star.

I started looking on line for border ideas, and simply could not find anything that looked right to me.  I did see one used quite often which I thought would be perfect - but it would have to be 6", and then I would have to come up with something to get the blocks up to 42", sigh.  I did notice on some of the Feathered Star quilts, folks added a border around the star that matched the background and finally I had an idea!

Using EQ8;  My solution was to add a 2 1/4" border of white around the star, which is nice, as it floats rather than having the star points right up against a contrasting border. 

Then I made a pieced border of the small dark blue squares with the white.  This border finished at 1 1/4" wide with the little dark squares being 3/4".  I used Seminole piecing to make this border row.


I added a 3/4" border on each side of the Seminole pieced border using the same blue paisley fabric used in the star.  I wanted it to be 3/4" to match the dark blue squares.  Also the dark blue border around the on-point blocks is also 3/4" and I felt this consistency would add balance to the design.

Right now the border rows are not sewn together but rather just pinned in place on my design wall, and I will study it again tomorrow to make sure I like this layout.  But I think I have a winner here and am relieved that I finally came up with a solution.  The picture on the right includes the 2 1/4" white border.

I do love to do Seminole piecing and am happy that I have finally used it in a border on a quilt.  This quilt is going to measure 80" square unless I do a little something else to lengthen it.  I prefer rectangular quilts and may add a border of some kind to the top and bottom, but time will tell.  Knowing me, once I get to that point I may be so ready to be done with it that it will just have to be a square quilt.


Monday, December 31, 2018

Last Day of 2018

Thought I would make a list of all my active projects on this the last day of 2018, and just see how many of these get completed in 2019. 


Pemberely -  I had completed the center and one of the flower pots that go in each corner of the center by November 10.  And then on Nov.11, came my fall down a flight of stairs leaving me with a brain concussion and skull fracture.  I feel fortunate that nothing else was broken. Now today, 6 weeks later, I am almost back to normal and so thankful.

Couldn't do applique during this time, but feel certain that I will be able to start working on this right after the first of the year.


Star of Bethlehem - I have been quilting on this since July, but took the break in November and most of December.  I am back to quilting again and have complete all but the borders.  I am doing a large flower block in each corner and cross hatching the rest or the border.  Have two corners completed and nearly all of two sides.  Hopefully will have this quilt completed by the end of January.


Turevon Block of the Month - this is a project sponsored by my guild, York County Quilter's Guild, with one of our members, Sherri Turevon, designing the embroidered blocks and frame around the block for each month.  We each have to come up with our own setting for the embroidered blocks.  I decided to use a feathered star in the  center of the quilt and have the blocks surround the star as a border.  The blocks are 12" square and my feathered star is 30" square.  I am going to put a dark blue 1" border around each embroidered block, and then set them on point using the same blue flower in the feathered star as the corners.    I think I will have to increase the feathered star to 34"square, and will add borders of the dark blue and blue paisley used in the feathered star.  I hope to have enough of the dark blue left for the binding on the quilt.  I am excited about this project and hope to have the top completed by June 2019 as we will have a showing of the tops at our June guild meeting.  It is also next on my quilt hoop for hand quilting.

Rose Star - This is an English Paper Pieced pattern that I saw on someone's facebook page and just knew I had to try to make it.  I mapped out the kite patterns on Illustrator and decided on a 1 1/2" kite that will yield a 12" block.  This is the first block I have completed.  I had not planned to start this one just yet, but needed a hand work project to do in the hospital while staying with my husband .  He had back surgery on December 18 and the doctor told us to be prepared to stay in the hospital for up to 5 days.  So I got my pieces together and took them to the hospital - we were actually there only 3 days and he is doing very good.  Today he is driving and getting around, nearly pain free.  The fabrics I am using are Moda that I purchased in 2015 at Quilt Week in Chattanooga, Tn.  I purchased some near solids to go along with them.  My plans are to make at least 12 of these blocks, to circle a Lone Star quilt made from the same fabrics.  I am excited about this project and plan to EPP the entire quilt.

Now you make be thinking, 4 projects are not that many to have "in process" but I started a log of my quilts that were in process at the beginning of 2018 and by the end of the year I have 24 listed, of which 5 were finished during the year.  So right now I have 19 quilts in process - but only the 4 above are actively being worked on.  I do have two more to add that I have started preparing for my Stitchin Friends retreat in January. One will be a demo at the retreat and the other a lesson in February.  I will add them after the first of the year. 

My oldest quilt on the list is a Friendship Star quilt that my grandmother started the year I was born - 1950.  She only completed one block before she passed nine months after my birth.  The blocks were from kits she ordered from the newspaper and I actually have all the kits but one.  The second oldest is a Dear Jane quilt that I started in 2001, and have all the blocks completed except the kites around the center.  I would love to finish this one in 2019 - time will tell.

And just a wrap up of what I completed this year:

Jack's Chain - which I gave to my brother Jack for his 70's birthday.

This quilt was entirely pieced by hand (English Paper Piecing) and hand quilted using big stitch.

This pattern is called Ring Cycles and I purchased from Lessa in Australia. https://www.etsy.com/listing/217011346/ring-cycles-quilt-by-lessa-siegele-quilt
Determination Quilt - My husband helped me make this quilt cutting all the fabric for me.  We did this in February - March, after I broke by left wrist and was unable to do any handwork, or rotary cut fabric.  I was going nuts unable to quilt, so he helped me .  I called it Determination, because I was determined to get some kind of sewing done, and I discovered I could still machine sew.    This picture is of the quilt top, and my plan was to get a long arm quilter to quilt it for me, as that is more difficult to do with one hand.  He was disappointed, so I had to wait until August when my hand was strong enough to pull and tug this quilt thru my domestic machine. 

Hollis's Quilt  - October, 2018 saw the arrival of my 12 grandchild Holli Joy.  This is the quilt I made for her. 
Whales Ahoy -  a fun quilt to make for a baby boy.  This was a gift for a sweet new mom in my church
Happy - This is a quilt I started as a class for my Stitchin Friends quilt club.  Over the year 2018, I explained how to make each row, introducing new techniques for the row.  I chose to quilt each row as I went which was a major learning experience for me.  The biggest thing I learned was that rows shrink when quilted, and depending on the density of the quilting they can shrink a lot.  I learned to allow a border on each end of the row to allow for shrinkage.  My daughter, Jennie, loved this quilt, so she received it in December as a birthday gift.  I named the quilt, Happy, as the bright colors and whimsical pattern made me happy while making it.  For awhile I called it Sad, when I realized how my rows were shrinking.


Happy New Year ,
Teresa

Saturday, December 15, 2018

Happy Quilt

I finished my Happy Quilt back in November before my fall at church, but could not post pictures until after I gave it to my daughter, Jennie, for her birthday on December 6.   She had seen it in the making and told me how much she liked the quilt, so that told me where its home would be.
 
This quilt was a mystery row by row published by American Patchwork and Quilting during 2015, with one row per magazine published throughout the year.   I decided to do this "quilt as you go" project, quilting each row each month as I finished it.  I learned a very valuable lesson in doing this - depending on the density  of the quilting, the rows shrink up significantly. That first row of sunshines, started as 60" long and ended up as 58".  Then next row of squares only shrunk 1/2 " as the quilting was not as dense.  Sooooooooooo...I learned to modify the rows by adding some border to the ends of each row, quilted and then evened up the sides.  This worked pretty good for all but the butterfly row, where you can see I lost a little of the butterfly on the left because the row did not shrink as much as I thought it would.   It was nice when I completed the last row though, as I just had to sew it to the others and the quilt was done!
This is the back of the quilt.  One fun thing about quilting each row separately, I was able to use a different backing fabric for each row.  I dug into my stash of solids for the backings and thought it fun to come up with bright colors.  The fourth row down is actually a lime green.  All the colors were bright colors and  added to the happy theme.
 
An update on my concussion - I am doing well, the doctors are all surprised that I have progressed as quickly as I have.  I had a pretty serious concussion and fractured my skull a little.  I still have a little ways to go - kind of light headed and dizzy at times, as well as dealing with the wound on top of my head.  But so thankful that I did not injure any other part of my body.  I will be having some tests in Jan. for heart SVT which they think may have caused my fall.  Have had to delay that for a bit, as my husband is undergoing back surgery on Dec. 18 and I need to be able to help care for him.  We make quite a pair now - me with a walker and him with a cane, and possibly a walker after surgery.  But so thankful that he has been able to care for me during this recovery, and that I will be able to care for him after his surgery.  We are blessed with good children and friends who are also there to help when we need them.
 
Merry Christmas to you all and a Happy New Year!


Friday, November 16, 2018

Pemberley Quilt Progress


I started this post on Sunday afternoon and intended to finish it Sunday night when I got home from church.  Unfortunately at church, I fell down a flight of stairs, with a concussion and taken by ambulance to a trauma center in Charlotte.  I was released yesterday, and am wearing a heart monitor as the doctors think my heart has been beating at a fast rate and may be what caused me to black out on the steps and fall down the stairs.  Crystals in my ears were also dilodged and I am going through therapy to get them back in place.  I begin out out patient therapy on Tuesday.
 
This is my Pemberley and what I intended to post Sunday night.  I have completed the center and am starting to work on the corner flower pots.


Each corner on the center will have a flower pot and I have one completed.  I think they are so cute. The drawn lines are the cutting lines, and there will be a sashing border that will cover these edges.

I like to draw lines to show the placement of the applique.  I drawn the line inside the applique lines so that the lines will not show up when I place the applique in place.

My applique patters are cut from freezer paper, then traced on the from of the fabric.  I then trim the fabric to within 1/8" - 1/4" of the drawn line, and do needle turn applique.