Saturday was the monthly meeting of Stitchin' Friends - my quilt club. This is my favorite day of the month as we always have so much fun and it is just good to have that time of fellowship.
This Saturday I taught making the Twisted Pinwheels quilts with the Offset Square Template. I must admit, I was not too happy with this template when I first bought it. The instructions come with a picture of the block layout like the one you see on the cover, and instructions that basically say lay the template on the fabric, cut the fabric out, sew the pieces together.
So I go to my favorite source, Google, and found that many other women were having the same problems I was with the template. I contacted the designer, and she responded that the instructions that come with the template are all there are, but she did give me one very helpful hint that I will relay in a minute. Once I figured out how to make the quilt, it was simple and I just love making these now. I see a Christmas table runner in my future.
So here is the way I am putting it together:
- The template has no marking of which is the top and which is the bottom. You can use it either way, but you have to be consistent or pinwheels twist in different directions. So I laid the pinwheel on the one of the cover, to determine which was the correct side, and put a dimensional sticker on that side. Problem solved. My sticker is close to the center, but I had my group put their closer to the bottom right corner. What is interesting about this template is that it has two right angles and it can be confusing which one goes on the straight of grain. You have to study the picture closely to figure this out, but its the smallest side and the corresponding right angle that you line up on the straight of grain so that your block will not have bias on the outer edges. So move the sticker to the bottom right corner to remind you how to line it up.

- Next I made a "block board" covering a 7.5" square of cardboard with white flannel, then drawing the template on each corner of the board, just like the block goes together. This is extremely helpful when laying out your blocks. I made two for each for the club members, but they wanted more so they could layou the entire row.
It is important that when you cut out your fabric wedges, that all layers of the fabric have the right side up. Do not fold the fabric, as your pinwheels will be twisting in different directions if you do. I cut out 7.5 inch fabric squares, then cut the four wedges for the pinwheel out of each 7.5" square, hardly any fabric waste doing it this way. You cut the wedges out in the same order as shown on the block board.
3.. Here is the fabric laid out on the block:

I am doing my block scrappy style, so each of my wedges are different. You have to remember if you are wanting to add a border, on the top, bottom and side rows you have to add border wedges in the correct positions. I gave each member the layout for the table runner, and it sure helped to see where the border blocks go.
Further, I recommend that when making these block, you only sew together one block at a time. It is easy to get the wedge pieces out of order. They go together really fast though, kind of like making a four patch. The two sides you sew together are not the same length. You line the corner up that is in the center of the block, and there will be a little tail hanging off the outside edge, but it will be straight. Sorry no picture on that one.
4. The designer told me not to press any of the seams on the block until I had it all sewn together as this would minimize stretching along the bias. I tried this, and it really does help.
If you would like a .pdf copy of the instruction sheet I gave out at the meeting which includes fabric requirements for the table runner, a lapsize quilt and a full size quilt and a picture of the table runner layout, just send me a note at
jqd@comporium.net and I will put one in the mail to you.
Here's some pictures of the various fabrics the ladies used. Some got a away before I could take pictures. The variety was great!
 |
| Carol's |
 |
| Cheryls' |
 |
| Brenda's |
 |
| Linda's - she finished hers at home! |
 |
| Vicki's |
 |
| Mary's |
 |
This one is mine, hanging on my design wall at home. It will be a full size quilt.
And finally a little show (if you are still with me)
Brenda's Mariner's compass
 Darlene's Double Wedding Ring that was started several months ago as a table runner. She turned hers into a quilt for her daughter who recently married. Darlene's Double Wedding Ring that was started several months ago as a table runner. She turned hers into a quilt for her daughter who recently married.
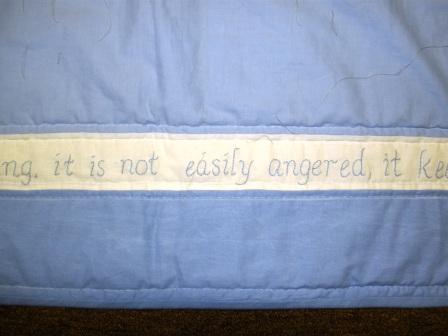
 The white border you see has a Bible verse, hand embroidered around the border of the quilt from I Corinthians. The white border you see has a Bible verse, hand embroidered around the border of the quilt from I Corinthians.
And she hand quilted it, beautifully!
Its truely an amazing quilt and Darlene has only been quilting for about a year now!!!!!
T-t-t-t-hat's all, folks, Teresa 28265 |
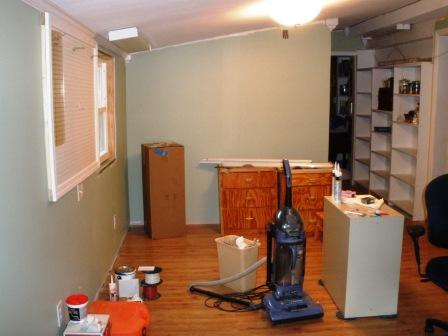 Well finally it is done (almost - a few pieces of trim still need to be added.) A look back - this is what my space looked like a couple of weeks ago. I have had my "treasures" boxed up for weeks now waiting for this renovation to begin and was so happy when it finally got started.